
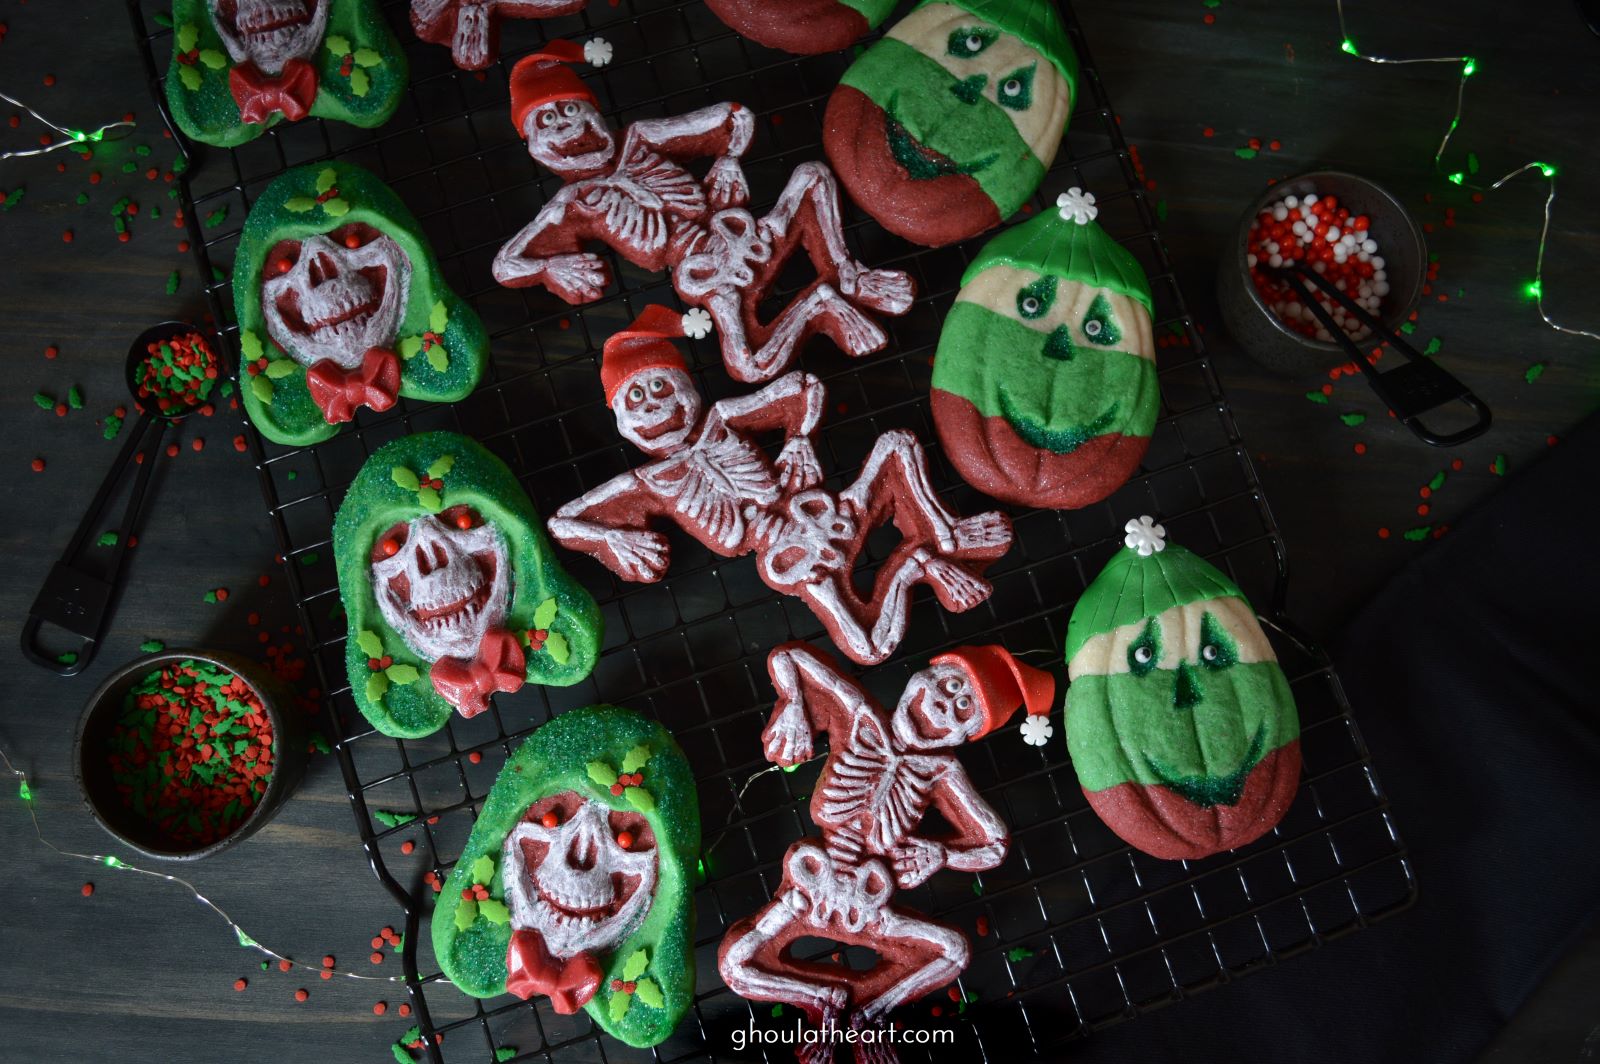
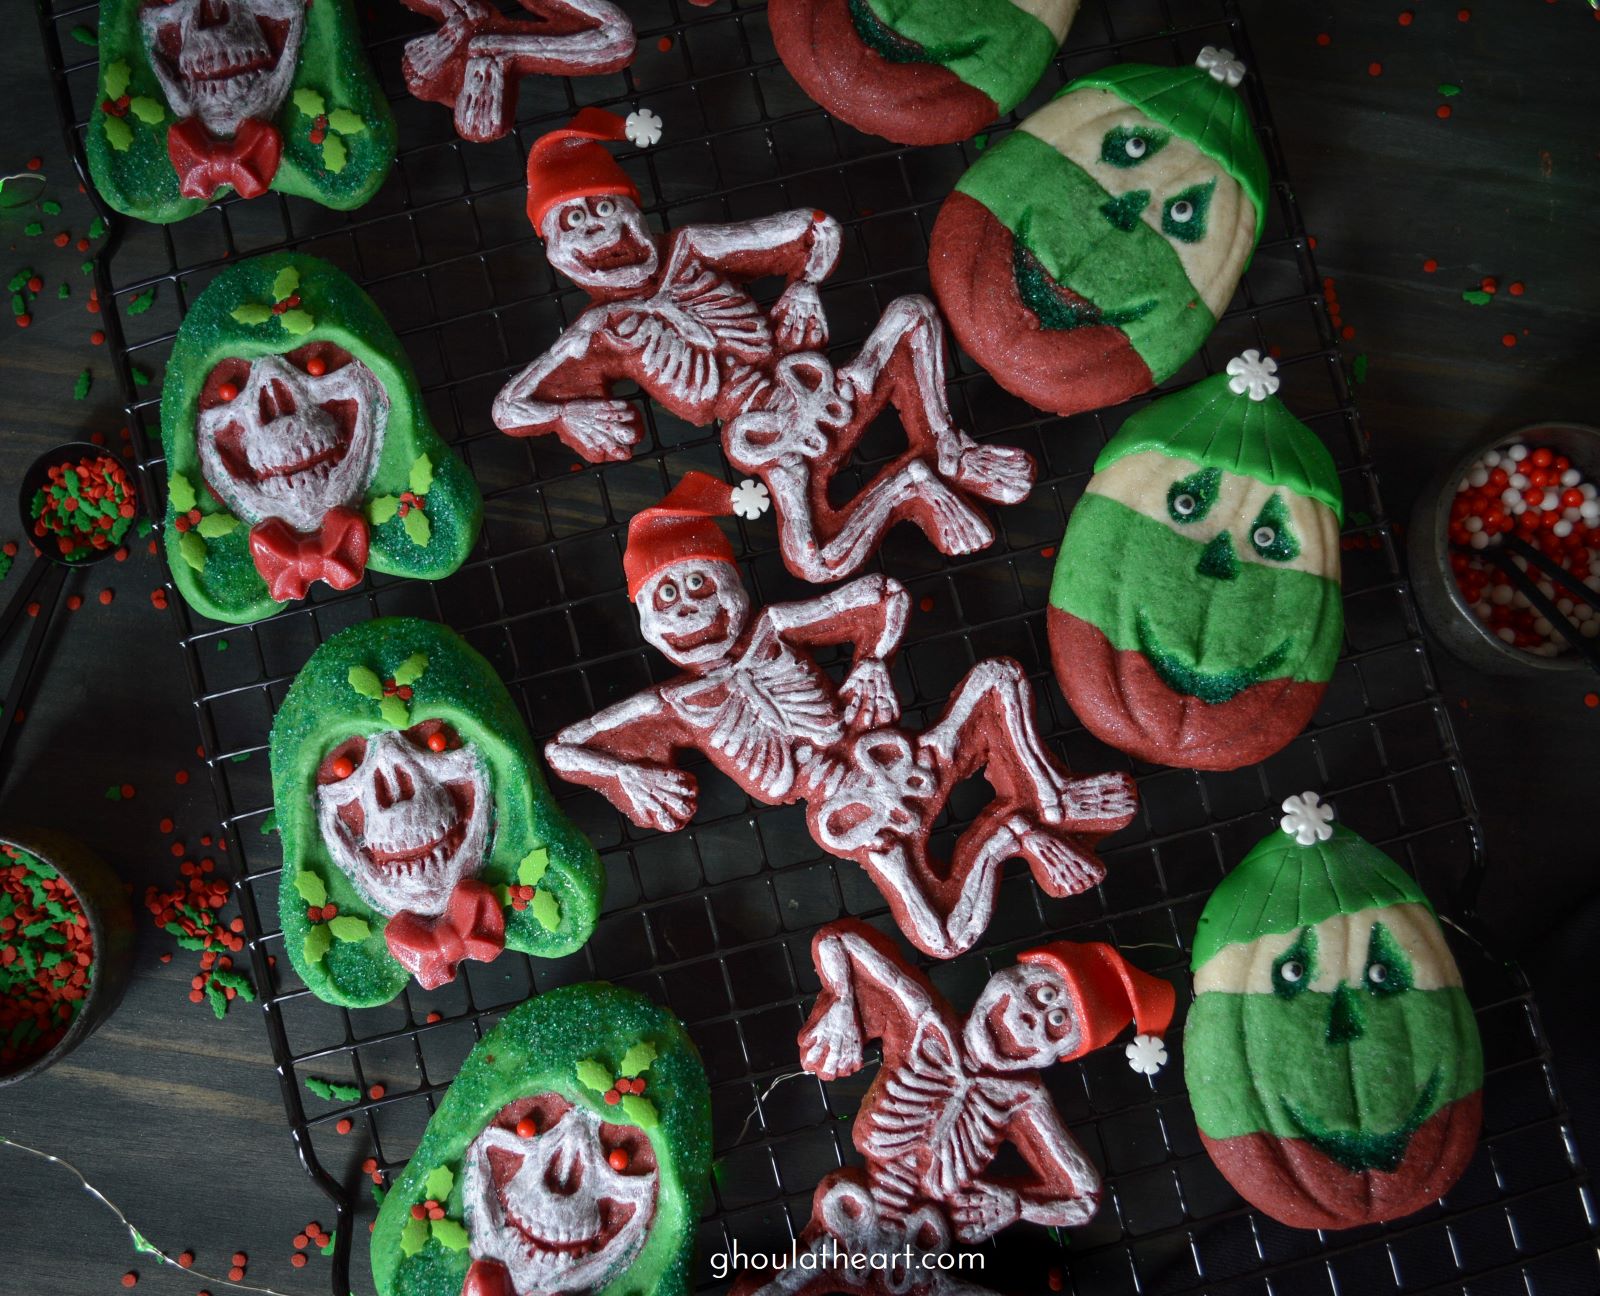
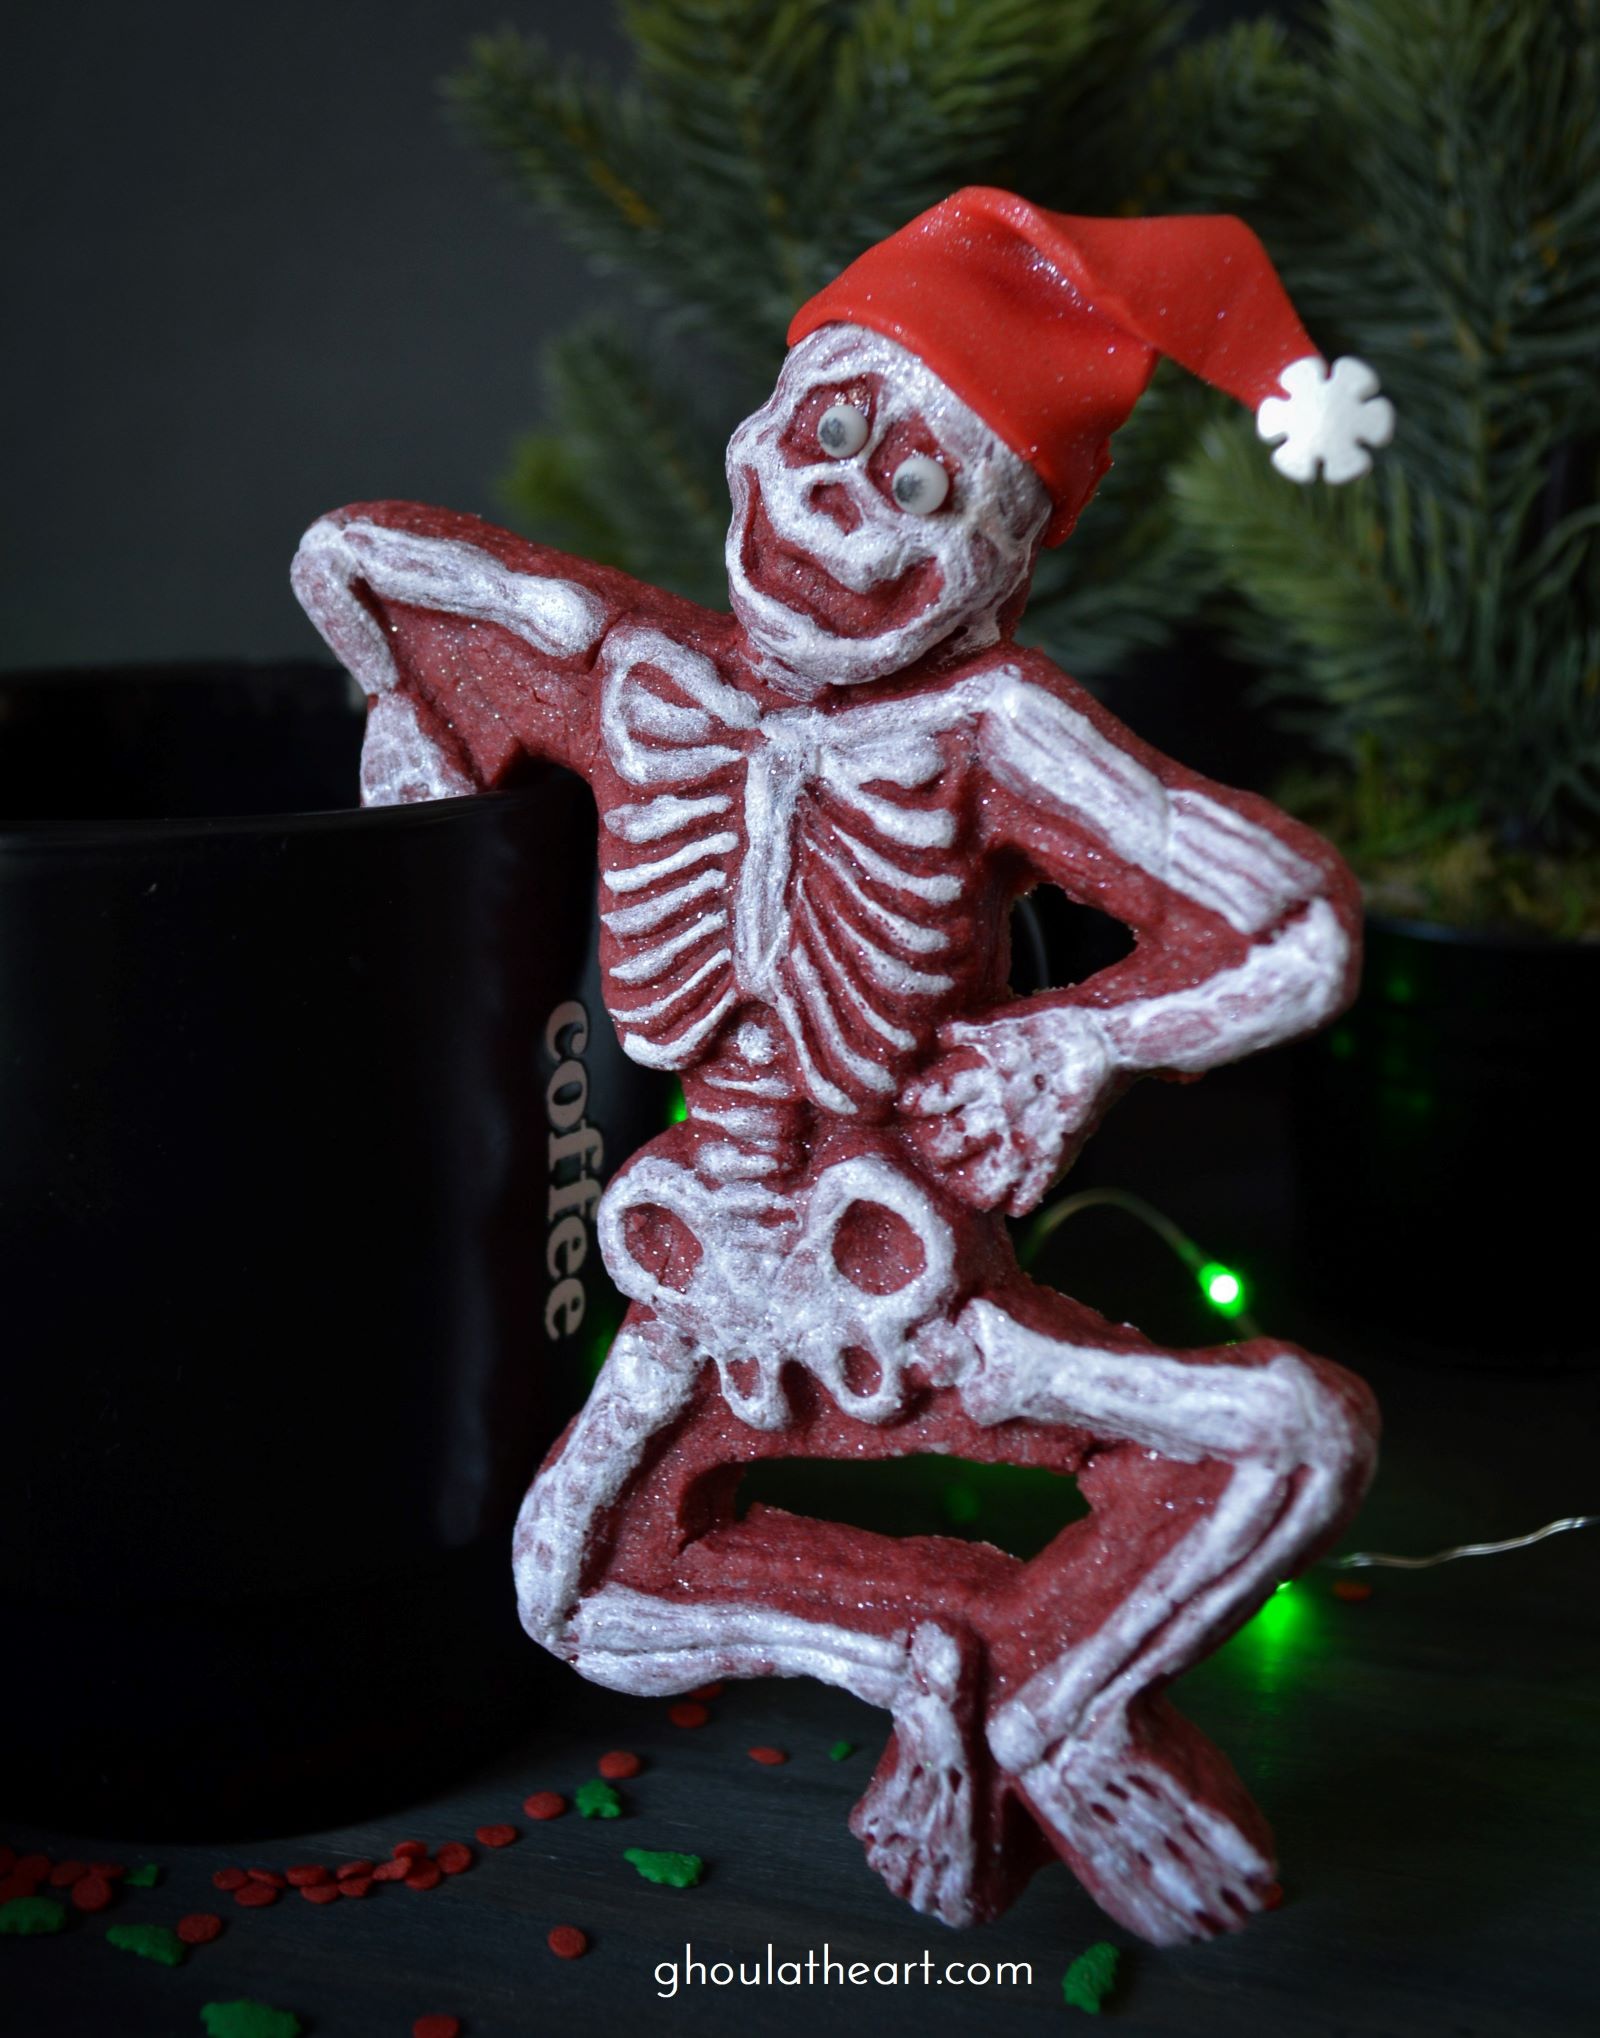
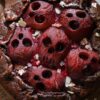
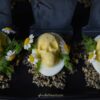
It’s so good to be back in the kitchen after taking November off to spend time with family and friends, so now I’m getting festive with some adorable sugar cookies made with these incredible cookie molds from Artesao Cookie Molds. Susan from Artesao was so generous to send these to me to play around with and boy did I have fun with them. I have big plans for these this next Halloween season but couldn’t wait that long so I decorated these spooky Creepmas Cookies just in time for the holidays. I affectionately call them Jingle Bones 💀, Grim Wreath-er 🎄, and Jolly St. Jack. 🎅
Be sure to check out all of Susan’s gorgeous molds, cookie mixes, and recipes on her website where you’ll find molds for every occasion. She has a ton of actual Christmas molds that are absolutely amazing! Enjoy!

Creepmas Cookies
Equipment
- Artesao Cookie Molds
- mini witch hat and circle cookie cutters (to make Santa hat for Jingle Bones & beanie for Jolly St. Jack)
Ingredients
Red Velvet Sugar Cookies
- 1 cup butter (228g)
- 4 oz. cream cheese (111g)
- 1 cup sugar (200g)
- 1 large egg yolk
- 2 tsp. vanilla extract
- 1 tbsp. red food coloring
- 3 cups flour (409g)
- ¼ cup corn starch (33g)
- ¼ cup cocoa powder (23g)
- ½ tsp. salt
- Assorted Christmas sprinkles
- red and green fondant
- edible adhesive
Sugar Cookie Dough
- 1 Artesao Cookie Mix (for regular and green dough)
Instructions
Red Velvet Sugar Cookies
- Cream together butter, cream cheese and sugar in a stand mixer on medium low for about 1 minute until smooth. Add egg yolk, vanilla, red food coloring and mix until combined on medium speed. Scrape bottom and sides and slowly add flour, cocoa, salt and corn starch and mix on medium low until a stiff dough forms. (about 1 minute) Wrap dough in plastic wrap and chill for 1 hour.
- Preheat oven to 375 degrees. Line cookie sheet with parchment paper. Dust mold with a small amount of powdered sugar to prevent sticking. Fill skeleton mold with cookie dough, roll a coffee cup over the dough to ensure a good impression. Clean off excess dough around edges, and turn mold upside down on parchment lined cookie sheet. Gently peel the mold away from the dough. Bake for 8-16 minutes, depending on thickness and size of cookie. The cookie is done when the edges are set and the center is still soft. (Jingle Bones cookies took about 12 minutes*)*Note: If you want to hang these red velvet cookies on a cup I would give them an additional minute or two to reduce the chance of breakage. The cream cheese in the dough keeps its very soft and delicious and also makes them a touch more delicate.
- Paint Jingle Bones with a mixture of meringue powder, water and white food coloring. Add 2 tsp of water to 1 tsp. of meringue powder and let it sit until the meringue powder absorbs the water. Add more water if needed to get the consistency of paint. Add a small squeeze of white food coloring. Apply with a small paintbrush and let dry.Roll out a thin piece of fondant and cut out witch hats. Add hat to head, fold over the pointed end and add a Christmas snowflake sprinkle to creat the Santa Hat. Dust with shimmer powder, add candy eyeballs and use a food safe marker to draw in the pupils. Allow to dry.
Sugar Cookie Dough
- Prepare dough according to package instructions. Divide dough into half and add green food coloring to one half of dough and mix until desired color is reached. Bake as directed on package.
- Jolly St. Jack Cookies: Dust pumpkin mold with powdered sugar. Fill in the top third of the mold with regular sugar cookie dough. Add the red velvet dough to the bottom third of the mold. Roll a long cylinder of green dough to fill in the middle third of the mold and press to fill in the mold and seam together the three colors. Roll with coffee cup to get a good impression. Clean up excess dough from sides and peel off mold on a parchment lined cookie sheet to reveal your candy corn St Jack. Use a paintbrush to put a thin coat of edible glue into the eyes, nose and mouth and sprinkle with green sanding sugar. Turn upside down to remove excess. Add candy eyeballs and use a food safe marker to draw in the pupils. Allow to dry. To make the beanies, cut a 3 inch circle out of green fondant and cut it in half. Place one half circle on head of pumpkin and tuck around the cookie. Add a snowflake sprinkle and use a knife to add detail to the fondant hat. Sprinkle with shimmer dust. (One circle makes two beanies)
- Grim Wreath-er Cookies:Dust Grim Reaper mold with powdered sugar. Use green sugar cookie dough to fill in the robe of the Grim Reaper to mimic the greenery of a wreath, leaving only his skull face unfilled. Use your fingers to create a clean line around the edge of his face. Next add a ball of red velvet cookie dough to the face of the grim Reaper and press to fill in the mold and seam together the two colors. Roll with a coffee cup to get a good impression. Clean up excess dough from sides and peel off mold on a parchment lined cookie sheet to reveal your Grim Wreath-er.Use meringue powder to paint he face of your Grim Wreath-er and allow to dry completely. Add Holly sprinkles to his wreath robe and add red candy eyeballs and allow to dry completely. Lightly coat the green robe with a little edible adhesive and sprinkle with green sanding sugar and turn upside down to remove excess and use a soft paint brush to remove any sugar from the eyes, nose or mouth that may remain. Optional: I added a red bow using melting chocolate and small bow mold that I picked up from a local bake shop, but there are many to choose from online.


Adorable
Thank you Wendy!
🖤 Lori
I had to get all 3 molds and a couple more. I love the names you came up with for each cookie too! Thank you for your inspiration.
I can’t wait to use them and look forward to seeing what you will come up with for Halloween.
Have a great Creepmas!
Yay! Thank you so much, I’m so happy you were inspired my dear! You will love these molds, the detail is incredible! Happy Creepmas Genie!
🖤Lori